Sloped yards give your property a unique look, but installing a fence on them can seem challenging. With some planning, you can build a sturdy, good-looking fence that fits your yard perfectly. This guide will show you how to build a fence on a slope, explain your installation options, and offer tips to help you avoid common mistakes.
Keep in mind that every sloped yard is different. Soil conditions, the degree of the slope, fence style, and local regulations can all affect the installation method. The information in this guide is meant to provide a general overview, but it may not apply to all situations. For complex slopes or unusual site conditions, additional adjustment may be necessary.
Overcoming the Challenge
Building a fence on uneven ground takes extra planning and care compared to a flat yard, but it’s doable if you’re patient. By choosing the right fence system, laying out your fence carefully, and placing posts correctly, you can create a strong, straight fence that looks great with your landscape.
Choosing Your Method
Before you start digging, take time to decide which installation technique will work best for your slope and fencing material.
The Stepped Method
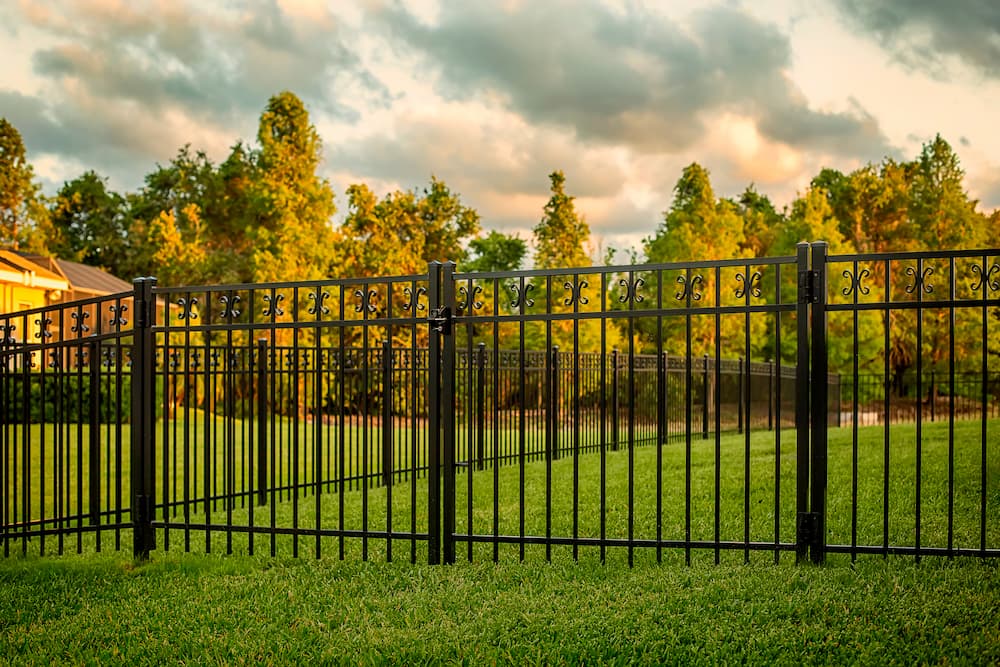
With the stepped method, each fence panel is installed level, but they connect together by "stepping down” along the slope. This creates a clean, geometric look.
Pros:
- Ideal for rigid horizontal fencing systems
- A necessary installation for land with an extreme slope
- Straightforward layout and beginner-friendly installation
- Less height loss
Cons:
- Triangular gaps form below panels, especially on steeper hills
- Panels often need to be cut in half with a post in between to reduce the gapping.
- May require additional material or landscaping to fill gaps
The Racked (or Sloped) Method
In a racked installation, the rails angle with the slope while the pickets stay vertical, allowing the fence to follow the terrain seamlessly.
Pros:
- Minimal gaps under the fence
- Smooth, polished appearance that blends naturally with the landscape
Cons:
- Requires rackable panels (available in many picket aluminum.)
- Some of the original height of the panel is lost.
- In vinyl, it can only be done in vertical picket fencing.
- In vinyl, rails and pickets have to be cut on the bias.
Step-by-Step Installation Guide
The key to learning how to install a fence on a slope comes down to careful prep and steady progress. Here is a simplified walk-through for both methods.
1. Planning and Layout
Start by mapping your fence line. Taking your time here ensures consistent spacing and fewer headaches.
- Run a string line from the highest point to the lowest to create a straight reference line.
- Mark post locations along the ground (not horizontally) at the regular spacing recommended for your fence type (often 6 or 8 feet). Depending on how extreme a slope you are dealing with, you might need to do sections with a post every 3ft or every 4ft.
2. Setting Posts on a Slope
- Insert the post into the hole. We suggest using all end posts or all blank posts for your sloped areas so that you can cut new holes into the post to match the rails better.
- Adjust to the rough height needed.
- Fill the hole around the post with dry concrete mix (sand, gravel, and cement), stopping 2"–4" below grade.
- Tamp the concrete to remove air pockets and ensure it is solid and will not move on its own.
3. Installing the Panels
How you install the panels will depend on whether you chose the stepped or racked method.
- Stepped fences: Measure the height from the ground to the bottom of each panel to maintain consistent steps down the slope. Install the panel, then move to the next post. If gaps form beneath, you can fill them later with hardscape or fencing accents.
- Racked fences: For aluminum, slide or secure the panel into position, so it pivots and follows the slope. Once aligned, fasten the rails in place to the posts.
- For sloping: First, figure out the angle that the bottom rail needs to be cut on the left and right side to go with the ground slope, and install it into the bottom hole of the first end post and the new hole you cut on the back of the other end post. Then, using a string line at the top, cut the same slope into the pickets and u-channels. Keep in mind how tall the pickets must remain to go inside the top rail. Then cut the top rail left and right side to match the slope needed.
Common Mistakes and Best Practices
Even if you’ve built fences before, working on a slope can be tricky. Watch out for these common mistakes:
Incorrect Post Depth
Always set posts deep enough for stability, no matter how tall they look after installation. On the downhill side, more of the post might show, but the anchor depth should stay the same.
Leaving Gaps Unaddressed (Stepped Fences)
Triangular gaps under the fence can let pets escape or wildlife get in. Plan ahead and fill these spaces with boards, stones, or landscaping as needed. While still leaving enough space for drainage.
Check Local Codes
Check your local building codes for rules about fence height and how much space to leave under the fence. Make sure you know the requirements before you start digging.
Choose the Right Product
Quality vinyl and aluminum fencing, such as the fencing from Fencing Direct, is made to handle changes in ground level, so racking and sloping is easy and secure.
Ready to Start Your Project?
To build a fence on a slope, choose the right installation method, plan your layout carefully, and use quality materials.
Check out Fencing Direct’s rackable aluminum and vinyl fence systems, designed for easy DIY installation on any type of ground.
Still Have Questions?
Reach out to us directly, we are here to help you!
Image Source: Genotar/Shutterstock
